Giovanni Militano

6 POSTS 0 COMMENTS

Records and LPs are making a strong comeback in the music world and that’s no lie.  I have personally re-introduced myself to playing records recently, thanks to the purchase of the fantastic sounding Rega RP3 turntable.  My current record collection consists of some 100 LPs and has been growing consistently.  As any self-respecting turntable owner, I want to take the best care of my growing record collection, so I started looking into record cleaning systems that would allow me to deep-clean my LPs, especially those dusty, well used albums that had not been played in years.  That said, most of the record cleaning machines or kits that I have come across are usually far too expensive to justify for a small LP collection like mine.  My search for an economical and easy to use LP cleaner led me to the Spin-Clean Record Washer, a kit that has been manufactured and hand assembled in Pittsburgh, Pennsylvania (USA) since 1975.  After 35 years on the market, the new Spin-Clean Record Washer MK II started shipping in June of 2010.  Major improvements were made to every aspect of the system -  everything from redesigning and refinishing the molds, to developing higher precision rollers, to manufacturing fluffier and more gentle drying cloths.  To my knowledge the Spin-Clean Record Washer MK II appears to be the least expensive thorough record cleaning and washing system available in the market today.  It retails for $79.99 US and includes everything you will need to start washing your records except for water which you should be able to find easily enough.  Besides the low cost, there are a couple important items that make the Spin-Clean different from most other record cleaners.  The record washing system requires no power at all as the cleaning process is performed completely by hand.  Another feature that makes the Spin-Clean unique is that each side of the record gets cleaned simultaneously – most other cleaners will only clean one album side at a time.  One more item to note, not only does the Spin-Clean accommodate your regular 12-inch records it will also accept and clean your 7-inch (45 rpm) and also 10-inch special sized albums (including 78 rpm).

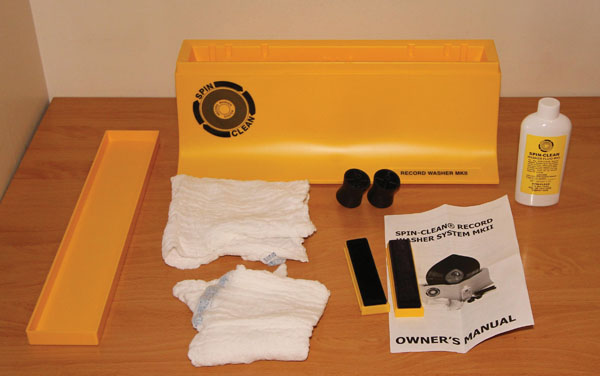
The Spin-Clean Record Washer MK II was neatly packaged inside a cardboard box which containted a washer basin and lid, 4 oz washer fluid, a pair of brushes, a pair of rollers, two washable drying cloths and the owner’s manual.  The instructions suggest that it is best to pre-wash the supplied drying cloths before using them for the first time to make them fluffier and more absorbent.

I must admit that I was anxious and somewhat excited to get started and clean my LP collection.  Some of my records date back to the 1970s and had not played in eons.  I set up the Spin-Clean as per the included instructions. I started by inserting the two rollers within each side of the washer basin to match the album size that I would be cleaning.  Next, I inserted the two brush pads, which slide tightly into the sloted midsection of the washer basin.  Then I filled the Spin-Clean basin with distilled water - it took about 650 mL of distilled water to fill the basin to the level indicator mark.  The final step was to pour three capfuls of the provided washer fluid directly over the brush pads.  The supplied record washer fluid is a flocculant – it works by encapsulating the dirt and forcing it down to the bottom of the cleaning basin.  This prevents any dirt and debris from being suspended in the cleaning bath and being re-deposited back onto the record while being cleaned.  The Spin-Clean washer basin is a brilliant honey-bee yellow colour for a reason -  the bright colour allows you to easily see all of the dirt as it accumulates at the bottom of the basin.  This will help you visually assess when it is time to replace the water and cleaning fluid.

The owner’s manual suggests to use distilled water rather than ordinary tap water to wash your vinyl records. Distilled water can usually be purchased from a local grocery store and a 4 Litre jug will typically cost about $2.  However, the Spin-Clean owner’s manual also indicates that if distilled water is not available, tap water can be used as a substitute.  I definitely recommend using distilled water since tap water often contains salts and other dissolved minerals that may cause water spots and streaking, or a build up of tiny particles that can get trapped within the grooves of the records.

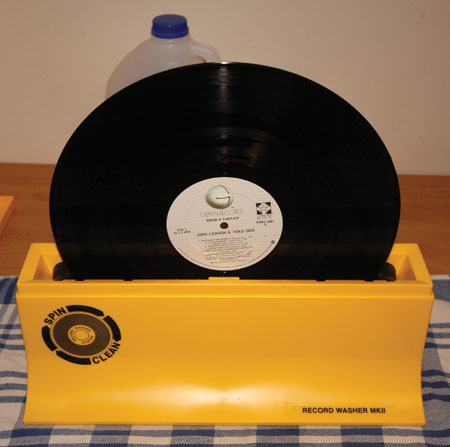
To test out the Spin-Clean record washing system, I started with about one-third of my album collection, or about 35 LPs.  The records I selected for cleaning varied in age and condition from new, with very little play, to well-used, dusty and streaky LPs.  The record cleaning process is very simple: gently push the LP in-between the cleaning brushes and down into the washing basin; rotate the LP 3 times clockwise and 3 times counter-clockwise; then wipe the LP dry with the drying cloths.  The record cleaning system holds the LP securely and tightly in place, so in order to spin the album, press your inner palms firmly on the outside edges of the record and rotate.  Remember, you don’t want to touch the surface of the record.  Once the LP had been cleaned, I used the two supplied drying cloths (one in each hand and folded in half) to carefully lift and remove the freshly cleaned LP from the record washing basin.  The final step in the cleaning process is to wipe the record dry in a circular motion using the drying cloths.  To make sure the LP was completely dry, I let it air-dry for a few minutes on each side.  As an optional cleaning step, I zapped the freshly cleaned LP records with a Milty Pro Zerostat 3 anti-static gun priot to returning it  to the record sleeve – to make sure the record does not pick up any dust.  Voila!  You now have an incredibly clean and shiny as new record, that certainly doesn’t visually appear to be 30 years old.  Once I got into the swing of record cleaning I found that the whole process went by fairly quickly and it only took about two to hours hours to thoroughly clean 35 records.  That’s not too bad for accomplishing this level of deep cleaning. The instructions indicate that the bath water will be good to clean up to as many as 50 records. The actual amount of LPs that can be cleaned will vary somewhat, depending on how filthy or not your records really are.  I found that after cleaning 35 records (some which were quite dirty), the bath water was ready to be replaced.  The amount of dirt and sediment that had collected at the bottom of the basin was absolutely remarkable.  Who knew that my records were so dirty?  The cleaned records looked like they were fresh off the press.  Seeing all this dirt at the bottom of the basin really confirmed that the Spin-Clean does a very thorough job deep cleaning vinyl records and left me with a smile on my face.

The difference between the original and freshly washed records was remarkable.  My Supertramp record looked like it came fresh off the press!

I was very impressed with not only the visual appeal of the pristine shine on all of the cleaned records, but more importantly with the improved sound quality after the record cleaning process. My records, especially those that are most dear to my heart, now sounded fantastic!  After cleaning the records, surface and background noise were hardly noticeable – seemingly pushed deep into the background.  All that was left to do was to sit back, relax and enjoy my old albums all over again. If you don’t mind putting in a little elbow grease to clean your records, the Spin-Clean Record Washer MK II will do an excellent job of thoroughly cleaning your records.  Note that because of the preparation of the kit and the cleaning method itself, the Spin-Clean is best suited for washing several records at a time.  I give a strong recommendation of the Spin-Clean record cleaner to all value-conscience vinyl enthusiasts.

Giovanni Militano is the editor of
www.diyAudioProjects.com.

Spin-Clean International
www.spincleanrecordwasher.com
1-800-931-5850

Spin-Clean Record WasherSystem Mk II
Price: $79 US

Just a little over three years ago I joined the CANADA HiFi contributor team and my first assignment was a review of the then new Rega P1 turntable which was published in the February/March 2009 issue. I enjoyed the P1 turntable so much that I purchased one for myself and that rekindled an old love affair with my vinyl collection. Since that turntable review I have grown my collection of LPs, purchased record brushes, a record cleaner, a cartridge upgrade, a stylus force gauge and an antistatic gun. While the above additions have brought upon some small improvements to my analog setup, I’ve really been itching to try out a higher quality turntable to extract even more detail and warmth from my LPs. While the Rega RP1 has come to market as a replacement for the P1, I was interested in auditioning the new RP3 model which replaces the popular P3-24 model.

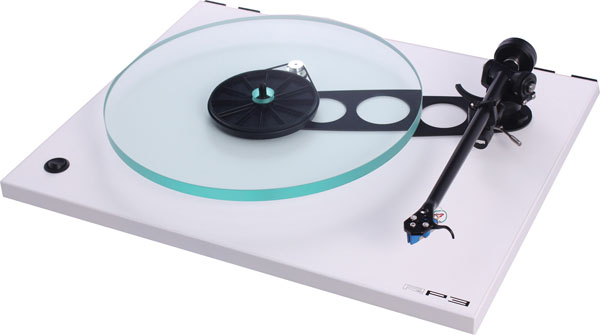
Although the RP3 is a new model number it is not a new design, but rather a design that has been evolving for more than 30 years now. The evolution of the RP3 goes back to the Rega Planar 3 which debuted in 1978 and continued on as the iconic P3 and more recently the P3-24 turntable. In many ways the RP3 table looks pretty much like previous generations maintaining the simple and functional design that has worked so well. The product literature indicates that Rega has upgraded the RP3 turntable in a number of areas which include a new tonearm, a new double brace and an improved lightweight plinth. The largest improvement over the previous turntable models is the addition of a double strengthening brace which is constructed from a hard phenolic resin and used between the tonearm mounting and the main hub bearing. This “Double Brace Technology” provides increased stiffness between the tonearm and the main bearing where the increased rigidity is required most. The RP3 comes with a new tonearm, the RB303 which is hand assembled and features a more rigid arm with better weight distribution that results in better resonance control. The cartridge mount has also been improved and allows for a three-screw arrangement which I find makes it much easier to align the cartridge. Further refinements have been made to the lightweight plinth by reducing the weight while maintaining rigidity of the plinth. This unique plinth design was pioneered by Rega and is constructed using a very lightweight particulate core which is coated with a very rigid phenolic resin skin. This rigid lightweight plinth design limits energy absorption and unwanted resonances which can induce unnatural distortions to the music. High quality parts are used throughout the RP3 - including a precision manufactured main bearing and a low noise 24V motor that is hand tuned to further reduce vibration. The suspension is comprised of three solid rubber feet and like any record player will sound best with a dedicated support platform which is not coupled to a flexible floor and located as far away from speakers as possible.

The Rega RP3 was shipped to me from Canadian distributor Plurison inside an oversized double box with plenty of air cushioned packing material. Inside the shipping box was the thick Rega cardboard box which contained the turntable. The outside of the box identifies the turntable model, colour of the plinth and the serial number. The demonstration unit came in a white finish. Before one unpacks the turntable, I suggest taking a few moments to observe the turntable packaging guide which is printed on the side of the box as this will help with unpacking the delicate turntable. It is also a good idea to hang on to the Rega cardboard box as this will be the safest way to package and safely transport the turntable in the future. The first turntable unit that was shipped out to us for review had been improperly packaged and as a result the centre hub had fallen out of place allowing the inner bearing and lubricant to escape. Unfortunately this required that the turntable be returned to the distributor to ensure that the unit was in proper working order prior to conducting the review. The initial setup of the turntable is very simple. Start by attaching the drive belt from the centre hub to the drive pulley. There are two wheels on the drive pulley, the small pulley wheel sets the speed to 33-1/3 RPM while the large pulley wheel will set the speed at 45 RPM. The glass platter simply drops onto the centre hub and the felt mat is placed on the platter. The turntable comes with an acrylic dust cover which easily drops into the hinge brackets at the rear of the plinth. Next you need to setup the tonearm which is somewhat more involved. Steps outlining setup of the tonearm are contained in the one page (double sided) instructions that are provided with the turntable. This review unit was shipped with an installed Rega Elys 2 cartridge. To confirm that the cartridge was properly fitted I checked the alignment using the supplied alignment protractor, and no adjustments were necessary. The next step is to setup the tonearm and set the tracking force. The instructions outline how to setup the tonearm and set the tracking force using a visual method and the pressure dials on the tonearm. In the past I have found that pressure dials on tonearms are often not very accurate so for peace of mind my preference is to use a scale in order to accurately set the tracking force. I used a simple and inexpensive balance pivot scale made by Ortofon which retails for about $15. The simple pivot scale works ok, but a more accurate and modern approach to set the tracking force would be to use a digital stylus gauge which typically costs about $100. Getting the tracking force set properly is important as too much force could result in excessive wear on your records and the stylus and too little force may result in reduced sonic performance. Now that you have taken the time to properly setup the turntable you are ready to sit back and enjoy your favorite LPs.

For the sonic evaluation of the RP3 my listening setup consisted of a NAD C162 preamplifer, a pair of OddWatt Audio KT88 push-pull monoblock amplifiers and Dallas rear-loaded horn speakers with Fostex FE206E drivers. I used a number of different records that I am familiar with that ranged from pop and rock albums to symphony music. Like the other Rega turntables I have heard, I found that the RP3 delivered a rich lively sound that really engages the listener with the music. By far the biggest improvements that I noticed over my entry-level P1 turntable were in the bass regions which had a better weight and resulted in a much more balanced overall sound. While listening to some of my favorite albums, the self-titled Tracy Chapman [1988 Elektra/Asylum] and Kraftwerk – The Man Machine [1978 Capitol, HQ re-issue] I heard a firmer low-end with additional texture. Through the RP3 the music had a fast and lively pace with good detail and dynamics. With Supertramp – Crisis? What Crisis? [1975 A&M, Audiophile Series re-issue] I found that the high-end response was extended, detailed and free of any graininess which can be quite common on entry-level turntables. Personally I find surface noise to be very distracting and because I enjoy a lot of music with quiet passages it is important to me that unwanted and background noise is low. With Arthur Fielder and the Boson Pops playing the music of Paul Simon [1972 Polydor] I was really impressed with how well the Rega RP3 (equipped with the Elys 2 cartridge) handled the occasional clicks and pops by seemingly pushing them off into the back.

For those who like to tweak and further improve their turntables, Rega offers a number of different upgrades for the RP3. When purchasing the turntable there are three cartridge options. If you already have a great cartridge, the RP3 can be purchased without any cartridge for $1,095. There are two moving magnet cartridges available from Rega, the Elys 2 for $300 and for those looking for even higher-quality the Rega Exact for $595. Both the Elys 2 and Exact cartridges are handmade. Additional upgrades include a Drive Belt upgrade ($60), and the TT PSU electronic speed changer and power supply ($395). The TT PSU offers a lower noise floor, better speed control and also the ability to change the speed of the turntable without having to lift the platter and move the drive belt to a different pulley wheel.

Overall I found the RP3 to be a significant sonic improvement over entry-level turntables like the P1 and at triple the cost one should expect such an improvement. The biggest improvements came at the frequency extremes (bass and highs) which allowed the RP3 to deliver a well balanced sound that was engaging and one that can be listened to for hours on end without the onset of fatigue. For the price the Rega RP3 delivers good value and is a logical upgrade to any entry-level turntable. With the upgraded tonearm and new double brace mounting the RP3 will also appeal to long-time owners of earlier P3 models.

Rega Research Limited
www.rega.co.uk

Distributed in Canada by Plurison
www.plurison.com
1-866-271-5689

Rega RP3 Turntable

Price: $1,095 CAD (without cartridge); add $300 for Rega Elys 2 or $595 for Rega Exact cartridge

As a civil design engineer, many years of formal training and work experience have conditioned me to look past the flashy facades and to focus on the important parts of the building like the foundation and superstructure. Not surprisingly, I also use this sort of logic when it comes to influencing my choices in hi-fidelity audio components. When it comes to audio reproduction, I am always willing to sacrifice the ease of use and the aesthetics of a component for better sound. During my search for a new DAC and while researching the various USB capable models a few months back I came across the Musical Fidelity V-DAC. There are many reviews for the V-DAC and the general consensus is high value with less than pleasing aesthetics. This really should come as no surprise as the design of the V-DAC was described by Musical Fidelity as being analogous to that of a Formula 1 race car – a focus on what is under the hood with no excess or wastage anywhere. That sort of design philosophy is music to my ears and the V-DAC seemed like just what I was looking for so I contacted to Musical Fidelity to request a sample for a test drive. Musical Fidelity responded with what at the time seemed like bad news – sorry we are all sold out of the V-DAC. About one month later the good news was realized, Musical Fidelity had released the follow-up model, the V-DAC II and a sample was on the way! This was excellent news and I was eager to read up about the updated model and the new features.

The Musical Fidelity web page for the new V-DAC II noted in the design background that “When the original V-DAC was launched three years ago, it got excellent reviews. The technical reviews, in particular, were outstanding, and the V-DAC proved to be popular with music loving audiophiles. Most competent reviewers realized that the V-DAC was the technical equal of other DACs up to ten times the price. The only real criticism was about its appearance.” With that in mind Musical Fidelity set out to update the V-DAC by improving the appearance and finish of the chassis, updating the standard USB input to an asynchronous USB port and improving the technical performance. While I’m sure there are many that are pleased with the upgrades to the finish of the enclosure, I’m excited about the asynchronous USB port. I’ve had the opportunity to live with the V-DAC II for about five weeks now and I’ve put together this review to share my experiences.

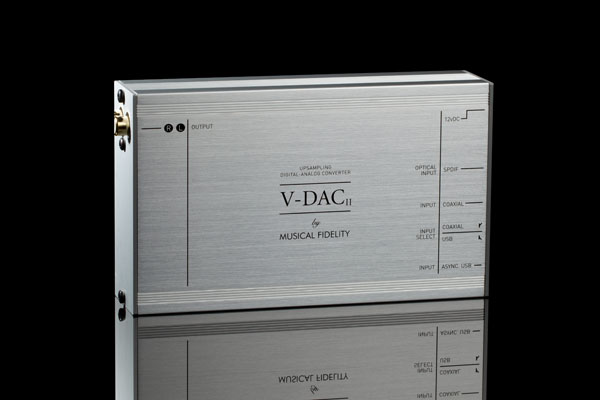
Apparently when it comes to hi-fi products, looks do matter and Musical Fidelity has responded by replacing the flat black enclosure with a new shiny, brushed aluminum extruded chassis. The white flashy lettering has been replaced with a typical font that does not stand out. The silver V-DAC II measures 170 x 95 x 40 mm (about the size of a 3.5″ external hard drive) weighs about 350 grams, feels solid and appears to be well built. On the bottom there are two rubber feet that run the length of the enclosure. The audio output from the DAC is via one set of RCA outputs located at one end of the enclosure. The digital inputs are located at the opposite end and consist of a USB (type B) port, an RCA (coaxial) and a S/PDIF (optical) input. There is an input switch which will allow you to select the input mode between either USB or optical/coaxial. The switch itself is very small and located in between the USB and coaxial inputs. With both inputs in use some may find it a little difficult to get their finger in there to flip the switch. There are two LED indicators, a cool blue for power and a light green to indicate a digital signal lock. Power to the unit is provided by an external 12VDC (500 mA) wall wart power supply included with the DAC. There are no power controls on the DAC or the external power supply. The stock wall wart power supply can be upgraded with the Musical Fidelity V-PSU II ($249 US). All the connections and controls are labeled on the enclosure. The input selection switch is marked as selectable between USB and coaxial, but it actually selects between either the USB port or both the optical and coaxial inputs. Under the hood of the V-DAC II is a Burr-Brown SRC4392 stereo, asynchronous sample rate converter and a Burr-Brown DSD1796 stereo DAC (24-Bit 192 kHz). The quality CMOS chips confirm that the focus of this DAC design has been on the insides. The specifications indicate that the V-DAC II will upsample to 24-bit 192 kHz. The USB input will accept asynchronous data streams up to 24-bit 96 kHz. The maximum output signal is 2.2V. The noted specifications are excellent and further improved from the earlier model. Across 20 Hz to 20 kHz the response is noted as +0/-0.1 dB, THD (total harmonic distortion) is 0.004 % and the SNR (signal to noise ratio) is -117 dB.

Set up of the Musical Fidelity V-DAC II is very simple. The RCA outputs connect to the analogue input of your preamplifier / integrated amplifier / headphone amplifier. I connected to a NAD C162 preamplifier which drives a pair of OddWatt Audio KT88 monoblock amplifiers. Since there are no power controls on the DAC itself, I used the switched AC outlet on the preamp to control power to the V-DAC II. I tested both the coaxial and optical inputs with an Oppo BDP-83 Blu-ray player. I connected a laptop with Windows 7 to the USB and did not experience any software setup issues. I also tested the V-DAC II on a PC with Windows XP and again there were no software issues. Once the DAC was powered up and the USB input was selected, the Windows operating system automatically identified and installed the DAC as new computer hardware. All computer audio was now directed towards the DAC and playing music was as simple as launching the media playback software (foobar2000 in my case) and hitting play. I started with an album called Getz/Gilberto by Stan Getz and João Gilberto (Verve Records, 1963) available from HDtracks as a 24-bit 96 kHz digital download ($17.98US). While this is an older recording, the chart topping jazz album (featuring excellent saxophone, guitar and piano) is a great choice to break in any new piece of equipment. Using the USB input, the output level from the DAC can be controlled on the computer. Further listening included my only 24-bit 192 kHz album, Mozart in Vienna with Gottlieb Wallisch on piano (Linn Records, 2010, £18.00). Playback was flawless even though the USB input is limited to 96 kHz, I assume the data is down sampled on the software side. I enjoy big warm tube audio sound and I really enjoyed the neutral sound from the V-DAC II. I found it to be airy, crisp and rich with fine details. Some digital converters sound too hard and sharp to my ears and that kills the emotion of the recording. Using the DAC with a computer is an enormous and obvious sonic upgrade over the audio quality using the computer internals. Armed with CDs of The Beatles “Love” (EMI, 2006) and The All-Time Greatest Hits of Roy Orbison (MFSL, 1972, 2008) and using the Oppo BDP-83 I made direct comparisons between the on board DAC and the V-DAC II. Switching between the two really emphasized the extra air, space and detail that is present when listening through the upsampling V-DAC II. Overall I found that the V-DAC II had a neutral yet pleasant sound that was accurate and rich with details and emotion.

Having used the updated V-DAC II by Musical Fidelity for over a month now, there is no doubt in my mind that the success of the earlier model will be matched and exceeded. The improved model uses the latest digital technology, delivers excellent sonic performance and is wrapped up in a functional and trim package, all with a modest price tag. The V-DAC II can be used to fill many roles such as upgrading the aging digital end of your old CD player and to integrate your computer with your hi-fi system. With a retail price of $349 US and considering the multiples uses and the high level of performance that is delivered, there is excellent value for the money here. While you may develop your first impression based on the new appearance of the V-DAC II, it’s the performance and excellent value that will make the lasting impression.

Musical Fidelity
www.musicalfidelity.com
+44 (0)20 8900 2866
Distributed in North America by
Tempo Distribution LLC
www.tempohighfidelity.com
(617) 314-9227 

Musical Fidelity Upsampling Digital-Analog Converter V-DAC II

Price: $349 US


It’s an exciting day as you rush home eager to try out that new audio or video component that you just purchased.  After taking time to carefully hook up the new gear and double checking that all the connections are correct you are finally ready to sit back, relax and audition the new component.  You find your favorite beverage, get comfortable and power up the system.  But just as the party is getting started, there is an annoying and unwanted interruption!  You listen carefully and there is now an unwanted buzzing that is coming from the speakers which was definitely not present before.  In video signals ground loops are seen as bands of slightly different brightness scrolling vertically up the screen and these are often referred to as “hum bars”.  The moment is ruined and what’s worse is that you spend the next couple of hours trying to track down the problem with no success.  You can’t understand how this is possible as your wire runs are short and neat, you are using premium components and you are even using a power line filter.  At this point you may be ready to pull your hair out - but remarkably, there is good news.

In almost all the cases of unwanted noise, the problem can usually be traced back to a ground loop, poor wiring or a lack of grounding or shielding.  What’s even better is that most of these unwanted noise problems are actually quite easy to identify and can usually be addressed without the need for fancy test equipment or having to modify equipment.  In this article I will discuss the most common sources of unwanted noise and how to troubleshoot these problems.  Once armed with this information you will be able to quickly locate and solve the common unwanted noise problems when they appear.

Ground Loops

Almost all unwanted noise problems can be traced directly back to a ground loop.  In order to effectively locate and eliminate grounding noise problems, it is important to understand the mechanism that causes ground loops and unwanted noise.  A ground loop can develop when two or more components (audio and/or video) are connected to different physical grounding points or when they are connected to a common ground point, but through different electrical paths.  When different grounding points are present, there will almost certainly be a voltage difference (potential) between the two grounds and this voltage difference can result in circuit noise which can manifest as audio or video noise, typically hum.  If two pieces of audio equipment are plugged into different power outlets, there will likely be a difference in their respective ground potentials and this can result in noise problems.  The components used in audio systems will each have their own local grounding point that is typically referred to as the signal ground.  As a result, different grounding paths can occur when the components are connected together with interconnect cables that can tie the signal grounds of two or more units together.  Low current wiring such as interconnect cables are particularly susceptible to ground loop issues.

Once a ground loop is present, it can be eliminated in one of two ways.  The ground loop can be eliminated by removing the extra ground paths or grounding points to create a single-point ground system.  For safety reasons you should never remove or bypass the grounding pin of a three prong to AC plug to solve a ground loop problem.  The more common solution to address ground loop issues is to isolate the problem ground paths through the use of an isolation transformer, opto-isolotor or balanced circuitry.  At the consumer audio and video level, the most practical and typically the most economical solution for addressing common ground loop problems is the use of an isolation transformer.  An isolation transformer uses inductive coupling to pass the signal while interrupting the ground (breaking the ground loop).

Diagnosing the Noise Problem

The first step is to locate the source of the problem.  Countless hours can be wasted by simply pulling cables and swapping components at random so the best way to go about locating the problem is by checking a few common problems and determining if your problem is simple or complex.  You should be able to isolate most noise problems in just a matter of minutes.  The most common source of a ground loop in audio and video systems is the coaxial cable that delivers Cable TV (CATV).  This is a classic ground loop situation as all your system components are grounded through your local outlet while the Cable company is using a grounding point located some physical distance (often large) from your system ground.  A ground loop this large will almost certainly be a source of unwanted noise.

To check for this common problem, disconnect the main CATV lead.  If the hum goes away you have identified the source of the problem and can now work on a solution.

The next item to check is what affect the volume control has on the noise.  By volume control I mean the home theater receiver or processor, preamplifier or integrated amplifier.  Does the hum change when you touch the metal chassis?  If touching the chassis causes a change in the hum then you have a failed earth connection.  Check the power cord and ensure it is intact and is firmly attached to the AC outlet and there is a solid earth (ground) connection.  Does adjusting the volume control affect the hum level?  If changing the volume affects the hum level, then you know the source of the ground loop is somewhere before the volume control.  Otherwise you know that the noise problem must be occurring somewhere after the volume control.

Next on the list is to check all the components on the problem side.  Use the input selector to see if the hum changes based on what input you have selected.  If the hum is only present when a particular input is selected, power down and unplug that input - if the hum vanishes, the problem is with that component.  After cycling through the different inputs to find that there is no change in the hum level, then your problem is occurring at a later stage in the system.

Also, don’t forget to check external amplifiers like powered subwoofers.  Check the external amp by powering down and unplugging - if the hum goes away there is a ground loop with that amplifier.

Solving Noise Problems

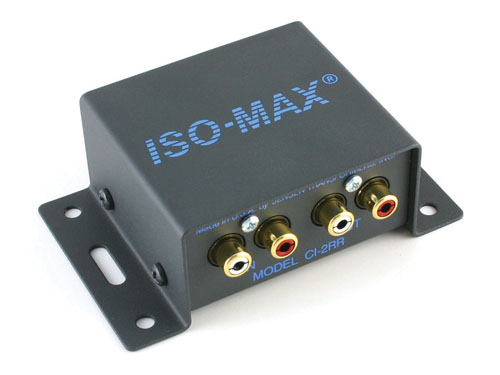
With the problem component identified, it’s time to come up with a solution.  Quite often the CATV coaxial cable is the culprit of the ground loops.  The use of a CATV ground isolator is the most common and a simple solution to implement.  There are many CATV isolators on the market to choose from.  I suggest you invest in a name brand CATV isolator as some low quality products may reduce the signal quality.  Note that some power line filters/conditioners come with a CATV isolator.

Once you have the problem component identified, check the AC plug for damage or excess wear.  Make sure the plug grips the socket well as loose contacts can be a noise source.  Remember, if the problem component is plugged into a different AC outlet as the other components this could be a ground loop.

Using a power distribution unit (power bar) or power filter/conditioner for all your components will ensure that your system has a common power ground.  If you are still experiencing hum problems, check the outlet with a polarity checker (available at hardware stores for about $10) as it is not uncommon for an outlet to be wired incorrectly.

Other common sources of noise problems are light dimmers, fluorescent lamps and other appliances that share the same circuit or a common ground with your equipment.

Armed with this information you should be able to solve the most often encountered ground loop and grounding issues. Remember to engage a qualified electrician if you need to fix house wiring.  Most importantly, never remove or bypass the grounding pin of a three prong to AC plug to solve a ground loop problem as this defeats the safety ground.

by Giovanni Militano of www.diyAudioProjects.com

It was only a few short years ago that I recall a local group of audio enthusiasts who got together for cold beverage sampling and auditioning of hi-fi audio gear.  As a new audio system was being swapped in for auditioning, the conversation turned to the components being installed – a new SACD player and a strange small to medium sized component with only a power button on the front and not much going on in the back.  With delight Bill told us about his new toys – a new SACD player and an external companion DAC.  The group reaction was mostly muted, yet they were all very interested.  While most here were familiar with the basic role that a DAC plays in a CD player or a home theatre receiver, the concept of using an external DAC was brand new to most.  It is rather amazing to recall how much has changed in recent memory with regards to audio media.  Analog tapes have pretty much disappeared, yet analog records after reaching all time sales lows have reversed the trend and are slowly gaining popularity once again with each passing year.  On the digital media side, the CD which can be largely credited with the declining sales slumps of analog media is now also seeing declining unit sales.  What’s changed is that more and more of us are moving to computer based storage for our digital music media.  This is an interesting time for audio enthusiasts as the growth of digital media formats means that the music of the world is now just a few clicks away and all from the comfort of your home.  Better yet is that some of the musical selections are now offered in high-resolution and studio master quality formats.  So if you have a basic understanding of the role that a DAC plays as part of a CD player, you can probably see how your computer or tiny hand held media player can benefit from a DAC.  Don’t worry if this is all new to you.  In this article I explain the basics of a DAC, how it works and what to look for when buying one.  At the end of the article I share a list of some popular DAC units that are available on the market with a brief description of their features and limitations.

Let’s start right from the beginning – DAC is short for digital-to-analog converter.  The operation of a DAC is just as simple as the name implies, a DAC converts a digital binary code into a line-level analog signal (voltage).  This low-current voltage signal will then typically be fed into a preamplifier or an integrated amplifier and from there follow the remaining audio chain.  For a detailed description regarding the operation of a DAC, see the online Wikipedia entry for digital-to-analog converter.  When sizing up a DAC, the most important specifications that one should consider are the bit depth and sampling frequency limits.  If the media you are attempting to play has a greater bit depth or sampling frequency than the digital input is rated for, you will not be able to play the music.  24-bits and 96 kHz will be sufficient for most digital music including most high-resolution media.  However, if you are interested in the studio masters that are being offered by an increasing number audiophile recording labels, you should consider a DAC with 24-bit depth and 192 kHz sampling frequency.  Many of the DACs that are on the market now offer upsampling which is not to be mistaken with oversampling.  When upsampling I have found the best results are achieved by upsampling in whole numbers (i.e. upsample a 44.1 kHz CD to 88.2 kHz or 176.4 kHz).  If you will be using a S/PDIF signal as the primary source you will want to use a DAC that features a low-jitter clock for best performance, while a USB signal inherently has no jitter.  As with all audio gear you will want to make sure the DAC comes with a good quality, quiet power supply.  The inputs and outputs vary significantly from one DAC to another so be sure that the available connections are compatible with your system.  Outside the main role of the DAC, which is to perform digital to analog conversion, there may be other additional features such as filters to alter sound, a headphone amp, and a phono and line-level preamplifier.  The values of the additional features will depend on your intended uses.

The list below features a number of popular DACs that are currently available, ranging from $300 to $1300.  The notes below give a brief overview of each DAC and list the various inputs and outputs, limitations of bit depth and sampling frequency and any extra features that the DAC model has to offer.

Musical Fidelity V-DAC - $299 (approx.)
The small and plain looking Musical Fidelity V-DAC is a 24-bit/192kHz upsampling DAC.  There are digital inputs for coaxial, optical and USB data streams at the rear and the analog output is via a set of RCA jacks at the front.  The DAC is powered by a 12V DC external wallwart power supply and for improved performance an upgraded/improved power supply module is available from Musical Fidelity.  Despite the bare bones look and lack of extra features the low cost and reports of good performance has made the Musical Fidelity V-DAC a popular choice amongst audio enthusiasts.

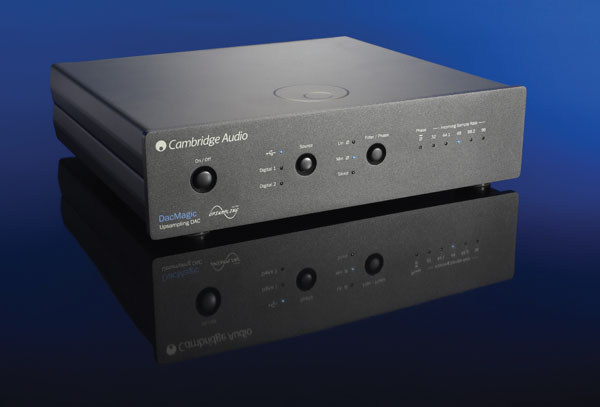
Cambridge Audio DacMagic - $499
The DacMagic is a 24-bit/192kHz upsampling DAC with an excellent layout and ergonomics.  The DAC features two digital inputs which can be either coaxial or optical and there is a USB input which will allow you to connect a portable media device or a computer.  Digital input depth and sampling frequency is up to 24-bits/96kHz however the USB input is limited to 16-bits and 44.1kHz or 48kHz.  There are both XLR balanced and RCA unbalanced analog outputs.  The DacMagic uses a large external wall-wart power supply.

Alpha Design Labs GT40 DAC (by Furutech) - $495
Don’t let the name fool you as the Alpha Design Labs GT40 DAC is a lot more than just a DAC.  In addition to the 24-bit/96kHz DAC the GT40 also offers a built-in headphone amplifier with a front panel output and volume control as well as a selectable moving-magnet / moving-coil RIAA phono stage.  What makes the GT40 even more unique is that the phono stage includes an analog-to-digital converter (ADC) that will allow you to digitally record your LPs at 24-bits/96kHz.  The signal inputs of the DAC are limited to USB for digital and RCA for the phono input.  Analog output is provided via a pair of RCA connectors located at the rear of the unit.  See the December/January 2010/2011 issue of CANADA HiFi for a full review of the Alpha Design Labs GT40 DAC.

Music Hall DAC25.3 - $595 (approx.)
The Music Hall DAC25.3 is 24-bit/192kHz upsampling DAC which also includes a headphone amplifier with volume control.  The rear panel includes four digital inputs (optical, coaxial, balanced and USB) and both balanced and unbalanced analog audio outputs.  The USB input will accept 24-bit/96kHz data.  The headphone jack and volume control are at the front, but note that the volume control is for the headphone output only.  This DAC is quite different from the rest in this list in that is uses a 6922 vacuum tube in the output stage.

Musical Fidelity M1DAC - $699 (approx.)
European manufacturer Musical Fidelity was one of the first companies ever to build a DAC and from that lineage comes the M1DAC. The M1DAC will lock on to any S/PDIF signal up to 192kHz and the input sampling frequency is displayed on the front panel.  The DAC will upsample to 24-bit at 192kHz.  There are four digital inputs; coaxial, optical, balanced and USB.  The USB input is however limited to a maximum 16-bit/48kHz datastream.  The DAC features a choke regulated power supply which results in a very low noise floor.

Benchmark Media Systems DAC1, $995 (approx.) and DAC1 USB, $1295 (approx.)
The Benchmark DAC1 is a 24-bit/192kHz digital to analog converter that also includes an internal headphone amplifier with dual front-panel headphone jacks.  There are three digital inputs on the rear for coaxial, optical and XLR. The DAC1 has both balanced and unbalanced analog outputs that can be switched between calibrated and variable which will also allow the DAC1 to function as a simple 2-channel preamplifier with the volume control on the front panel.  The DAC1 USB model retails for $1295 and includes a USB 1.1 port which will accept audio data directly from a computer at bit depths of up to 24-bits, but the USB sampling rates are limited to 96kHz.

Rega Research DAC - $1095
The Rega DAC is a 16/20/24-bit at 32kHz to 192kHz digital to analogue converter.  The DAC features  two isolated coaxial inputs, two optical inputs and an isolated USB input.  All the connections are at the rear and analog output is via a set of RCA jacks.  The controls for the Rega DAC are at the front of the unit and there are 5 user selectable digital filters to alter the sound to your liking.  High quality parts are used throughout the DAC.  A full review of the Rega DAC is available in the April/May 2011 issue of CANADA HiFi.

Buying speakers can be a lot of fun but for most of us does not happen too frequently.  So when the time comes you’ll want to be prepared and spend plenty of time auditioning speakers as you’ll likely live with them for a while.  One typically bases their buying decision on a number of parameters such as how well the speakers perform, how much they cost, their physical size, aesthetics and specifications.  Speaker specifications are typically noted right on the speakers or in the accompanying product literature.  What has always surprised me is how many people base their loudspeaker buying decision largely on specifications, in particular the “frequency response”, yet they really don’t have an understanding of what the specifications actually mean.  In this article I will walk you through basic speaker specifications which will help you to better understand how to interpret speaker specifications to aid in your future speaker buying decision.

There is a good deal of confusion that surrounds loudspeaker specifications which seems to stem from a combination of limited information, different test methods and a lack of consumer knowledge.  Some specifications are intuitive and easy to understand, such as dimensions, weight, type of speaker enclosure and crossover frequency among others.  The purpose of this article is to explain the more technical, and often misinterpreted, specifications including speaker impedance, sensitivity and frequency response.

Impedance

The loudspeaker’s impedance is the AC resistance of the loudspeaker to the audio signal from the amplifier.  Most loudspeakers have an impedance rating that falls between 2 and 16 ohms, with 4 and 8 ohm impedance ratings being the most common.  The impedance specification is often a source of confusion.  Part of the confusion stems from the fact that the loudspeaker’s impedance will vary (sometimes significantly) with frequency.  In contrast, only one value of impedance will be noted in the specifications.  Impedance is most often measured at 1 kHz but unless this is stated in the specifications, you won’t know for sure.  The reported impedance specification could also be the average impedance across the frequency response.  Given this variability, one should not put too much emphasis on rated impedance and it should only be used to give you a general idea of how the speaker will load your amplifier.  A higher impedance speaker will require high voltages and less current from the amplifier, which is generally considered less demanding on an amplifier.  A lower impedance loudspeaker requires high current and lower voltage, and is considered more demanding on an amplifier.  Use the speaker impedance specification to determine if your amplifier can drive the loudspeakers.  Some amplifiers will not be able to drive lower impedance loudspeakers so be sure to check the speakers rated impedance against the allowable amplifier ratings.

Sensitivity

The sensitivity specification of a loudspeaker is one of the more useful specifications.  It will give you a general idea of how loud the speakers can play and how much power will be required to achieve desired listening levels.  Speaker sensitivity is the measurement of the amount of sound pressure that the loudspeaker will produce (i.e. how loud it will play), at a distance of one meter, when only one Watt of power is applied from an amplifier.  Sound pressure is typically measured in Decibels (dB).

Consider a speaker that has a rated sensitivity of 93 dB/1W/1m.  This sensitivity means that at a distance of 1 meter from the speaker, the sound pressure level (SPL) will be 93 dB when 1 Watt of power is applied.  There are a couple of general rules to remember that will let you put the sensitivity specification into context.  For every extra 3 dB of SPL that you would like, you need to double the input power.  So if we consider a loudspeaker with a sensitivity of 93 dB/1W/1m, at 1W of power the SPL is 93 dB, 2W is 96 dB, 4W is 99 dB, 8W is 102 dB, 16W is 105 dB and so on.  In comparison to a loudspeaker that has a sensitivity of 84 dB, you would require 128W of power to achieve a sound level of 105 dB.  It is also useful to remember that SPL is on a logarithmic scale, so every increase of 10 dB sounds about twice as loud to our ears.  What this translates into while speaker shopping is that a lower sensitivity loudspeaker will generally require higher powered amplifiers.  Owners of very low powered amplifiers like those based on single-ended triodes (SET) will pay a lot of attention to the sensitivity specification as they hunt for speakers with very high sensitivity.

Frequency Response

Of all the loudspeaker specifications, the frequency response is the easiest one to take out of context.  The frequency response is used to describe the audible frequency range that a loudspeaker can reproduce.  Audio frequencies are measured in Hertz (Hz) and the theoretical range of human hearing is generally regarded as being from about 20 Hz (the very lowest bass tones) through 20 kHz (the very highest treble notes).  It may seem logical to presume that a loudspeaker capable of reproducing all or more than the audible frequency range would be best.  But this is not the case, so don’t fall into that trap.

Consider an example where the frequency response of a bookshelf speaker is noted in the specifications as “55 Hz to 19 kHz”.  Note that the frequency response specification in our example does not include an amplitude tolerance.  Therefore we cannot be certain if 55 Hz represents the -3 dB point, the -10 dB point or some other point altogether.  Fortunately it is quite common that an amplitude tolerance will be noted along with the frequency response specification and it will often be defined as +/- 3 dB.  The inclusion of an amplitude tolerance in our bookshelf speaker example indicates that the amplitude of the speaker response relative to frequencies between 55 Hz and 19 kHz does not deviate by more than plus or minus 3 dB.  To put this amount of amplitude change into context relative to our hearing, a change of 3 dB is generally considered to be barely perceptible.  Without an amplitude tolerance one can only guess as to what the frequency response means.  But even when the frequency response is put into context with an amplitude tolerance the specification still does not give any real indication of how well the loudspeaker performs.  At best, the frequency response specification of a loudspeaker should only be used to give a general indication of how high the treble frequencies will reach and how low the bass notes will hit.

To get a better indication of how a speaker will perform, you will need to look at Frequency Response plots, Cumulative Spectral Decay plots and Impulse Response plots.  You may be able to obtain these from the speaker manufacturer or find them as part of a speaker review.

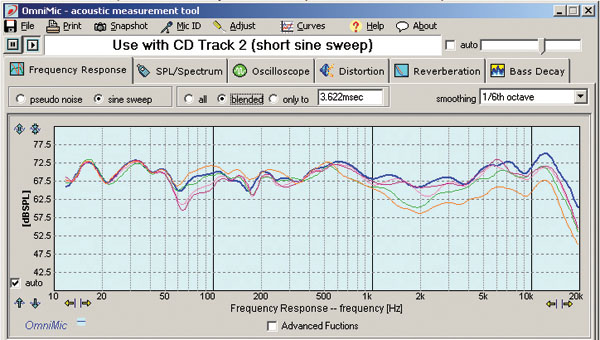
Figure 1: A Loudspeaker’s Frequency Response Chart (or a frequency vs. amplitude plot).

A frequency response plot is generated by using a calibrated microphone placed directly in front of the speakers.  The measurements are typically made in an anechoic chamber (a room with no reflective surfaces).  A sample frequency vs. amplitude plot is shown in figure 1.  The frequency response plot can be used to show how strongly a loudspeaker reproduces sound across the frequency range.  The curve will be higher on the plot at frequencies where the loudspeaker system plays louder, and lower at frequencies where the speaker is not as loud.  Typically a loudspeaker will have variations from 3 to 30 dB, often dropping off very rapidly at very low bass and very high frequencies.  Ideally a perfect frequency response plot would look like a flat line across the entire frequency range.  A frequency response plot that is predominately flat will generally reproduce all of the musical tones at the same level.  A flat response plot is generally good, indicating that the loudspeaker reproduces sound accurately.  But since inevitably the response will not be flat for any speaker, another positive characteristic to look for is a smooth response curve between the amplitude variations.  A smooth response curve will literally sound more smooth and natural.  You will want to avoid plots that show rapid swings in amplitude across a short span of frequency.

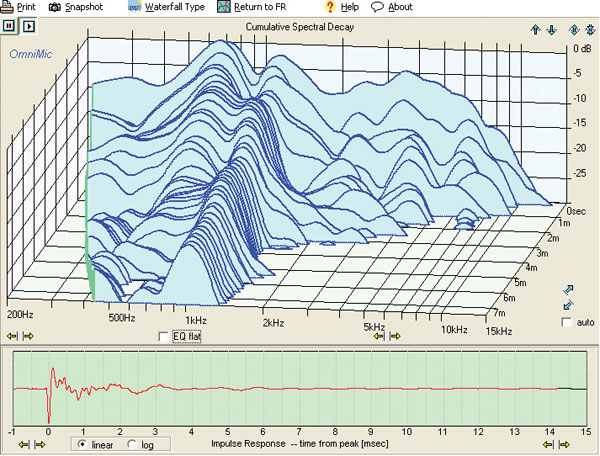
The frequency response plot however does not show the critical third dimension: time.  Examining plots that consider time will give us a visual indication of how a loudspeaker responds to a dynamic impulse.  For example, consider a loud thump from a kick drum.  When attempting to reproduce this thump the loudspeaker should start instantly and stop the very instant the kick drum stops making sound.  If the bass speaker continues to resonate and make sound after the thump has stopped, the loudspeaker is not accurately reproducing the thump by colouring the original sound.  The lower portion of figure 2 shows a typical measured impulse response.  The plot shows that some sound persists after the impulse input has stopped (i.e. the speakers resonate and “ring” after the impulse).

Figure 2: The top part shows a speaker’s Cumulative Spectral Decay (CSD) plot.  The bottom part shows a speaker’s Impulse Response.

In order to get a visual representation to what extent and at what frequencies the loudspeaker “ringing” is occurring, a Cumulative Spectral Decay (CSD) plot which shows the measured response of a speaker in frequency, amplitude and time is used.  In the CSD waterfall plot the third axis is time, so the lines closest to you are measurements taken later in time than the lines further back into the plot.  The perfect CSD plot would look like a straight line at the back with no lines towards the front.  The CSD plot in the top part of Figure 2 shows that most of the resonance is occurring around 1 kHz.

Finally…

Understanding how to read speak specifications is important and while the specifications can give you some general ideas about the loudspeaker, they alone cannot be used to gauge performance.  A frequency response plot could be more helpful, but it does not consider the critical element of time.  No matter how good you may be at interpreting loudspeaker data and CSD plots, this data was collected in a room free of reflective surfaces.  Thus one should not take specifications and measurements too seriously, but rather use them to assist when looking for a speaker.  I use the specifications and frequency response data to eliminate speakers that will obviously not be satisfactory for me.  Once those are out of the way then I can settle down to some careful auditioning and make an informed buying decision.